Using Clooz the first time
Learning how to use a new program can be overwhelming, especially when its approach is as different as Clooz is from typical genealogy programs and is rich in features. Using Clooz need not be difficult. This section will describe a few basic steps you can take when first using Clooz to get you oriented.
Steps to follow when using Clooz for the first time
Perhaps you are using Clooz for the first time. Here are a few steps to help you get oriented and start your first Clooz database:
-
Install the Clooz program, if not already installed on your computer. It's much the same as any standard Windows program. Step by Step instructions are available. On running Clooz the first time it will request you to enter your serial number (received when you purchased a Clooz user license). If you already have Clooz installed using a trial serial number, just enter your paid serial number when requested, or go to the Clooz license information screen under the Home tab, Tools.
-
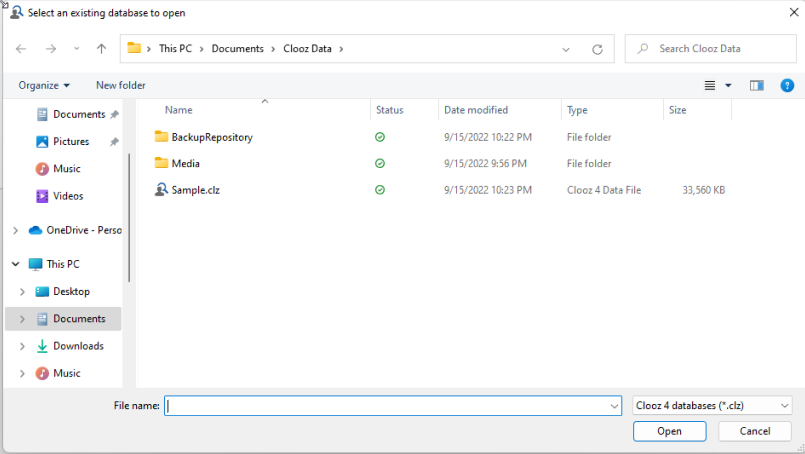
 Start up Clooz. Clooz stores its data in database files, much the same way that word processors save information in various document files, or spreadsheet programs save information in spreadsheet files. As a first step, open the Sample.clz database provided during the Clooz installation in the Clooz Data folder within your main Documents folder.
To open a database, click on the Home tab if not already selected. Then click on the Open Database button and select the Sample.clz database file from the window that pops up.
-
When opening a database the first time in Clooz, you will be requested to enter a User Name. This can be any name you desire. Clooz will be using it when tracking who is modifying the data.

-
After opening the Sample.clz database, you will automatically be switched to the Information Records
 Information Records in Clooz hold the content information coming from a document or other source. These differ from a Source record that contains most of the citation information describing the docment, or the Repository record referring to the facility or online service where the document was found. tab (you can customize the start-up tab selection in the program options later). The tabs on the top will switch you to that screen. Click on the Subjects Subjects are the objects you are gathering information about. In most cases with Clooz, this is people. However, Clooz supports several other types of subjects such as businesses, real estate/buildings, ships and artifacts. tab. Subjects in Clooz are what you are gathering information about (your research subjects). They are usually people, but could also be businesses, real estate Real estate or buildings is a Subject type in Clooz. This could be any type of property: land plot, farm, building, etc. (or buildings Real estate or buildings is a Subject type in Clooz. This could be any type of property: land plot, farm, building, etc.), ships or artifacts Artifacts are one of the Subject types in Clooz. They are meant to represent physical objects that have some significance in your research or family history..
Most of the main tabs in Clooz show the same overall layout, although the data contained will be different. Here is what we call the various screen components:

-
Select the type of Subject you want to see in the main data area by clicking on the type in the Navigation Panel.

Subject records
These are records in the Clooz database representing the Subjects being researched, and contain summary information about the Subject such as the birth, marriage, and death dates for people. are where you save your preferred name for each person (or other subject type), and other vital event dates and locations you have concluded to be correct based on all the information you have gathered in your research. The details provided by the various documents supporting this are entered as Information records (a different tab). -
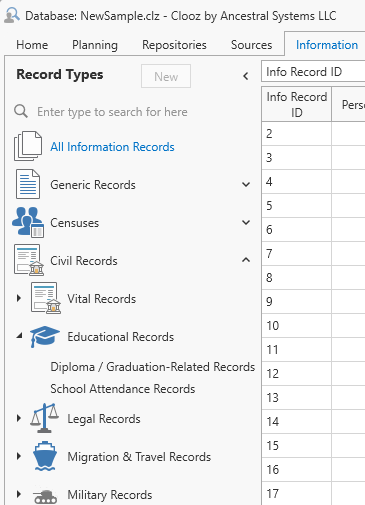 Click on the Information tab to see the list of Information records. This is where you keep information found in documents, books, websites, or any other type of information source A source record in Clooz should be viewed as the higher level components of a source citation. Citation details are pulled from the citing Information Record.. Higher-level citation information will be saved in Source records (another tab).
The Information Record tab is one of several features where you will spend most of your time. There are editing templates (Navigation Panel on left side of main window) for various document types. The individual templates are grouped into categories. Click a template or category to see those types of Information Records in the main list.
Clicking on a category also opens up a list of templates (or other more specific categories). Click on Civil Records to see the list of categories it contains, and then Education Records to see specific template types.
-
Information records consist of two main components: Common Information and Information Details.

When editing an Information record, the template will be showing each of these components in separate areas.
To edit an Information record, double click the record in the main list or right click and select Edit Item from the menu that pops up.
-
Here is an example of editing an Information record. First click on All Record Types in the Navigation Panel to show all records in the main list. Now double click on record 13, a Military Service Record.

This is an example of a Form-based template. It is most similar to the format used in Clooz 3. You select the Subject and then the Show Details button to see their information (or simply double-click on the Subject row). The fields for their detailed information will now appear in the top panel of the window. You can return to the Common Information by clicking the Show Main Information Record Form button, or select another Subject if there is one.

There are a number of powerful feature in the right-side panel. There are tabs for each one. We'll introduce a couple here to get you started, but you'll need to see the additional help topics related to them for further details.
Initially, the Source tab is selected. This is where you can select and existing Source providing a higher-level citation describing where the information in this record came from, or even create a new Source record. These are the same fields available in the editor under the main Source tab (main Clooz screen).
-
Click on the Subject tab in the right-side panel. You can now edit the Subject Record for the Subject who is currently selected in the list of Subjects.

Remember that the Subject record is your overall record for this person (versus the set of information presented in a single document). As you accumulate information you draw new conclusions and keep the Subject record up to date. You should enter the actual name (and spelling) shown in the document in the Information Record details for this person, and your preferred proper name form (birth name) in the Subject fields.
-
Clicking the Media
A digital file containing an image, text, spreadsheet, video, audio, or any other format. These can be attached to various records in Clooz as digital representations of source document content, or as Information Records (as photographs, maps, videos, or audio independent of a specific source document). tab will show what digital media files are attached to this Information Record. Digital files can easily be linked by dragging and dropping them into this panel.
To activate the internal Media Viewer in Clooz, just click on the media item's thumbnail image. The Media Viewer has many features itself, and is covered in other help topics.

-
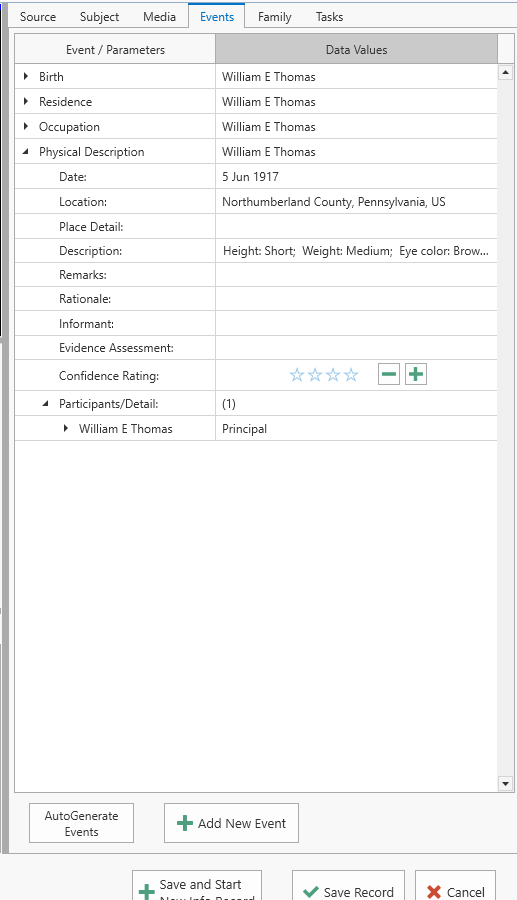 The Events tab is where you can extract any number of events from the Information record. The idea here is that you are only describing events that are entirely supported by information in this record. The event information may ultimately conflict with events described in other Information records. Contracting and comparing all of these events in the end is what allows you to develop an accurate and reliable family history.
Click the AutoGenerate Events button to have Clooz attempt to identify events. In cases where insufficient data exists or human insight is required, click the Add New Event to add an event. Additional commands are available in the right-click context menus.
The Family tab is similar where you can designate parent-child relationships within family units.
In both of these tabs remember to only include items where the evidence in this specific Information Record alone supports them.
-
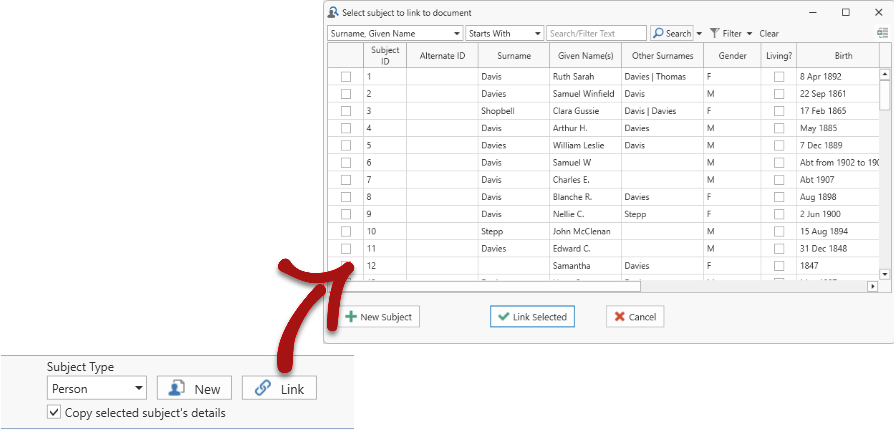
To add a Subject to the Information record, select the desired Subject Type at the bottom of the editor window and then click on New (to add a new blank Subject) or Link (to select an existing Subject from the list that pops up).
-
Finally, when you are finished editing click the Save Record button if you made changes or Cancel to close the editor.
-
Tabular record types, such as censuses and church record books, have editor templates that are grid-based. Instead of having a form type layout of fields, there is a spreadsheet like layout where each Subject occupies one row along with their data.
For an example of this editor format, double-click Information record 3 on the main list of Information records, which is a 1900 US Census. The grid columns match the actual census forms and the grid can be edited directly.

The rest of the editor works the same as the form-based layout.
-
Explore the different main tab screens and exercise the editor in each by editing records in this sample database. You can experiment by creating new records as well. Become familiar with how the editors are organized, with data common to the entire record in the top section. Most editor types have side panels on the right side which allow you to display and edit additional related information. Check out the additional help topics as you discover new features.
-
When you've explored enough and believe you are ready to start working on your own data, you first need to create a new database file to hold your information. You can do all your work using this one database file, or divide it up as necessary into as many database files as you need. To create the new database, go to the Home tab and click on the New button. You will then have to enter the name and location of this file you want to setup. We recommend keeping all your Clooz files in the Clooz Data folder, but that's up to you. Once named and created, your database is now ready and you are ready to start adding information to what is first appearing as a bunch of blank screens.
Here are some tips to make it easier for you as you use Clooz:
-
Spend some time experimenting with the Clooz sample.clz database to gain an understanding of how Clooz is structured and how things work.
-
Keep your main focus on the documents or other sources of information you are going to enter. Most work in Clooz centers around the Information Records you create to hold the contents of these information sources. You'll add the people the information covers as part of that.
-
Don't replicate your complete list of people from other genealogy programs you use in Clooz as a first step. Build the connections between Clooz and your family tree program as you go.
-
There is no right or wrong way to use Clooz. Use Clooz in the way that feels most comfortable and natural to you.
-
Like most advanced software, Clooz has many subtle features. You don't need to know many of them to get started. You'll learn them as you go. Don't be overwhelmed at the start.
-
Think about what you hope Clooz will be helping you with, which helps to develop a strategy on how to proceed:
-
As a research tool - Your top priority should be to enter information from new sources or information you have not really assessed or entered into your family tree program; i.e., don't try to enter all the documents you ever found related to areas of your family tree that have been well developed, as that will lead to burn out. When entering information records, include as much of the details from each as possible. The more details you enter, the more Clooz can do.
-
As part of a family tree re-do - Most of us have experienced the realization that our family tree has some issues, and see the need to re-do it from the start. For a strict re-do, don't import all your family tree people to relink to the information records you create. This leads to jumping to conclusions rapidly which is probably what caused the issues you are trying to get rid of. You should be performing a proper reevaluation of the evidence and creating new people in Clooz based on that data. In the end you can see how these people line up against what you had in your family tree originally.
-
As an indexing system - Perhaps you just want to have an index of names to information sources, providing their physical location in files or digital copies on your computer. If this is your goal, entering all the details for various information records may not be necessary. You would at least want to establish an information record for each item, attach any digital media files, and link the subjects to it. Some of the advanced features in Clooz will not be effective without the details, but it still serves as a powerful index to your library of information. You could also take a hybrid approach where you only enter the information details you are interested in, such as people's ages, relationships, locations, etc.
You've now been introduced to a few basic steps that should help you get oriented with Clooz and started on your research. We've just touched the surface of what are lots of features and capabilities. Use the explanations, tutorials, and videos in the Clooz help resources to guide you the rest of the way.